Plumbing is the system of pipes, fixtures, and appliances that deliver clean water and remove waste in residential and commercial buildings. Plumbers install and repair these systems, adhering to local and national codes and standards. Contact Rosenberg Plumbing for professional help.
Pipes are the heart of any plumbing system, transporting water from sources to fixtures and back again to the source. Valves, which control flow and pressure, are also essential to plumbing.
Plumbing is the system of pipes and fixtures that deliver fresh water and remove wastewater from a building. It is vital for modern living, and proper maintenance is essential to prevent leaks and other problems. Plumbers install and repair these systems in residential and commercial buildings. They also inspect and maintain sewage and drainage lines. Plumbers use a variety of tools and materials to perform their jobs. Some common materials include copper, PEX, PVC, and galvanized steel. They may also work with various types of fixtures, such as sinks, toilets, showers, and water heaters.
The sanitary sewer system is the component of the plumbing system that collects and transports waste from toilets, baths, and kitchens to the public sewage system or septic tank. The sanitary sewer system also includes a grit chamber, which is a long, shallow trough with a dip that acts like a trap. As the wastewater moves through the trough, it collects solid debris and any grease that has accumulated. The sanitary sewer system then deposits the debris in a tank or septic system for treatment.
In order to function properly, plumbing systems must adhere to strict regulations. These regulations set standards for materials, installation techniques, and inspections. They also address issues such as backflow prevention, water conservation, and energy efficiency. Plumbers must follow these regulations to ensure the safety of the public and protect the environment.
Plumbers often work in teams to complete large plumbing projects. They must collaborate with other members of the construction team to ensure that the plumbing system is installed correctly and integrated seamlessly into the overall project. They must also be able to identify and troubleshoot problems quickly. Other responsibilities include providing customer service and responding to emergency calls.
Plumbing is the installation and maintenance of process piping systems
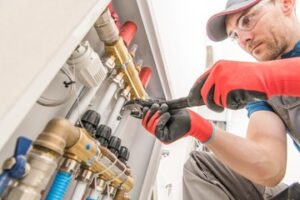
Process piping systems are essential for the safe transportation of liquids and gases that are part of industrial processes. These systems are often exposed to extreme temperature and pressure conditions, and they can be dangerous if not properly designed. This is why they must follow strict Occupational Health and Safety standards, including the use of heat-resistant materials. They are also required to be regularly inspected and maintained to prevent potential safety hazards.
The pipes in a plumbing system are typically made of copper or plastic and connect to shower and faucet systems in homes and businesses. However, the pipes that are used in industrial settings are not considered to be part of a plumbing system. Pipes that are connected to process machines in factories are called process piping systems and they do not follow the same codes as plumbing systems.
This type of piping is crucial in the manufacture of products like pharmaceuticals, food and beverage, power generation, chemical processing, and oil and gas production. These systems require a wide range of components, such as valves, strainers, flanges, and fittings, to function properly. They are also able to handle high temperatures and pressures, making them more durable than standard piping systems.
To ensure safety during the installation and maintenance of process piping systems, it is important to follow established protocols. This includes implementing Lockout/Tagout (LOTO) procedures, adhering to confined space entry guidelines, and ensuring workers are trained to safely operate machinery. It is also important to perform regular inspections and maintenance activities, including cleaning, repairing, and replacing components when necessary. This can help prevent costly breakdowns and improve efficiency. If you are in need of a professional to install or maintain your piping system, contact us for more information about our services.
Plumbing is the installation and maintenance of indoor plumbing systems
A plumbing system is an intricate network of pipes, fixtures, and appliances that supply water and remove wastewater. It is essential to both residential and commercial buildings, as it ensures that clean water is available for drinking, cooking, and cleaning, and that waste is removed in a safe and sanitary manner. A plumber is a professional who installs, repairs, and maintains these systems. They must have a thorough understanding of the laws of gravity, pressure, and temperature, as well as how to safely work with hazardous materials.
The history of indoor plumbing is a testament to human ingenuity and the drive for improved living standards. From ancient aqueducts to smart home systems, plumbing innovations have transformed the way we live. But despite these advancements, access to clean water and sanitation remains a challenge in many parts of the world.
Today’s plumbing systems rely on advanced technologies like sensor-operated faucets and smart toilets, but they still operate on the same basic principles. Water enters the house through a main line, and is distributed to various fixtures via a series of pipes. A meter tracks water usage, and a main shut-off valve allows you to cut off the water supply in case of an emergency.
While the history of plumbing is fascinating, it’s also important to remember that these systems are constantly evolving. New materials and technologies are always being introduced, and plumbers must stay up-to-date on the latest developments to keep their customers safe and happy. This is especially true in the field of green plumbing, where innovative solutions are being developed to reduce environmental impact and improve efficiency. For example, new types of pipes made from recycled materials can be used to reduce energy consumption and improve durability. Other ways to reduce your water footprint include installing low-flow faucets and showerheads, using appliances that minimize water usage, and implementing water-saving strategies.
Plumbing is the installation and maintenance of outdoor plumbing systems
Most homes have outdoor plumbing, including a hose or sprinkler system, and it’s important to keep these systems in good condition. Regular inspections can help you avoid major problems, like leaks and clogs. However, if you notice a problem, it’s best to contact a professional plumber right away. Leaking pipes can cause expensive damage to your home, and a clogged pipe can lead to flooding or water pooling in the yard.
Plumbing is a complex field that requires a wide range of skills and tools. In addition to installing and repairing plumbing fixtures, plumbers must also have knowledge of building codes and blueprints. They must also be able to troubleshoot issues with water pressure, temperature fluctuations, and other factors that can affect the integrity of pipes and fixtures.
The materials used in plumbing vary from traditional metals to modern plastics. Some common options include copper pipes, which are durable and corrosion-resistant, and PVC pipes, which are lightweight and cost-effective. They can be used in a variety of applications, including drain lines and vent stacks, and are resistant to heat and chemicals.
Outside plumbing can be affected by a variety of factors, including tree roots, freezing temperatures, and poor installation. A blocked sewer line is the most serious issue, and can affect all indoor plumbing in your home. Symptoms of this problem include a strange smell from your lawn, wet spots in your yard, and sewage backing up into your toilet and sinks. A plumber can inspect your sewer line and clean out any clogs. They can also recommend solutions for preventing future blockages. In most cases, this is a relatively inexpensive service, especially compared to the costs associated with repairing or replacing damaged plumbing.
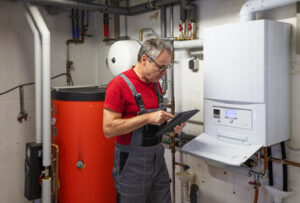
Plumbing is the installation and maintenance of water heaters
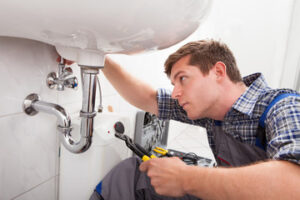
Plumbing is the system of pipes, fixtures and fittings that carry freshwater in and wastewater out of a home. It is crucial for modern life and provides safe, clean water for drinking and cooking. However, it can also cause significant damage when it is not properly maintained. Regular maintenance and occasional repairs can help prevent problems, but when issues do arise, a plumber’s expertise is needed.
Plumbing technicians install and repair fixtures like toilets, sinks, showers, and water heaters. They also maintain and inspect the plumbing systems in homes and commercial buildings. In addition, they may work on gas lines and perform backflow testing and certification. Plumbers use a variety of tools and materials to complete their work. Some common materials include copper, PEX, and PVC. Copper pipes are favored for their durability and resistance to corrosion, while PEX and PVC pipes are more flexible and easier to work with.
A home’s plumbing system consists of supply lines, drain lines, and the water heater. The supply line connects to the city water main and passes through a water meter to measure usage. It then branches off to deliver water to different fixtures, including sinks, bathtubs, showers, appliances, and toilets. Water heaters are a key component in any plumbing system, as they heat and distribute water throughout the home. Drain lines transport wastewater to the sewer system or septic tank, where they are disposed of.
Residential plumbers focus on plumbing systems in homes and apartments. Their job includes repairing leaks, unclogging drains, and installing new fixtures. They also inspect plumbing systems to ensure compliance with local and national building codes. Plumbers often work evenings and weekends to respond to emergency calls from homeowners.