Carpets trap dust and dirt particles that harm our health, especially if our homes have kids or pets. Keeping up with regular cleaning can help prevent these problems and prolong the life of our rugs.
Always treat stains as soon as they happen, blotting (not rubbing) them. The longer stain materials remain, the greater the chance of permanent color change or odor damage. Contact Carpet Cleaning El Dorado Hills CA now!
Carpet acts like a filter for many airborne pollutants, such as pet dander, dust, bacteria, mold spores, and other allergens. These particles stick to the fibers and are released back into the air when people walk on the floor, making regular deep cleaning essential for health. The best way to keep your carpet clean is to vacuum it regularly, especially with a vacuum cleaner that has a HEPA filter. However, even with frequent vacuuming, routine cleaning is needed to eliminate deep dirt and stains.
A professional carpet cleaning service can use powerful steamers to penetrate and loosen ingrained dirt and oil-based stains. They also provide deodorizing treatments to remove unpleasant odors from the flooring. Regular cleaning of your carpeting can restore the color and help it look more faithful to its original shade.
Other household carpet cleaning methods aren’t as effective. Vacuuming alone won’t get rid of dirt that’s deeply embedded within the fibers, and these methods may even make stains worse. They’re better used as supplements to the more thorough cleaning methods accepted by the industry.
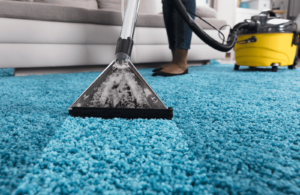
One of the most commonly used professional carpet cleaning methods is hot water extraction, or steam cleaning. In this process, a special chemical is applied to the carpet before the steam is generated by a high-powered machine that injects the chemical into the carpet. The hot steam liquefies the deposited dirt, killing any bugs and odor-causing organisms. Then the loosened dirt is extracted with clean water, leaving no residue or odors.
Another popular method is shampooing. This involves the application of specialty detergents with lots of water, similar to shampooing hair. A rotating brush is then used to scrub the carpet, and a machine extracts the shampoo along with the dissolved dirt. Shampooing is effective, but it doesn’t produce the same level of cleanliness as steam cleaning. Plus, shampoo residue can collect and attract dirt, causing the carpet to become dirtier faster than it was before the cleaning. This is why it’s best to use truck-mounted hot water extraction for the most effective results.
Preparation
Getting your carpets professionally cleaned is a great way to remove deep-seated dirt and stains, leaving you with fresh-looking, healthy carpeting. However, proper preparation is vital for the cleaning process to be effective. There are a number of easy things you can do to prepare your home for professional carpet cleaners, and these simple steps will make the cleaning process go much more smoothly.
Vacuuming the area before the carpet cleaner arrives is an important first step. This will help to remove loose dirt particles, allowing the cleaners to focus on the deep-seated dirt. It is also a good idea to identify problem areas of the room and point them out to the cleaners, as this will allow them to give those areas extra attention.
Next, you should pick up any full-length draperies that touch the floor and pin them up or reposition them so that they are at least six inches off of the ground. This will protect them from moisture and any heavy cleaning equipment that may be used during the cleaning process. It is a good idea to do the same for any upholstered furniture with skirts that touch the floor. It is also a good idea to move any breakable items from the area to be cleaned. This includes things like knick-knacks, delicate decorations, and any fragile heirlooms that you may have on display. If you have a particularly fragile item that cannot be moved, be sure to let the cleaners know and ask them to use extra caution when moving around it.
A basic carpet cleaning process involves using a rotating buffer with an absorbent covering that is sprayed with a mist of cleaning solution and then rubbed over the entire area of the carpet. As the covering is rubbed, it works to pull up dirt from the carpet, which is then vacuumed away. This method is typically faster and more thorough than other methods, but it can leave your carpets with a slightly damp smell for a few hours afterward.
During this time, it is a good idea to open windows and use fans for increased ventilation in the room. This will help to remove the excess moisture and prevent mold and mildew from forming in the room. It is also a good idea to wait until your carpets are completely dry before replacing any furniture or walking on them.
Removal
When your carpet is clean, it’s important to protect it from future dirt and stains. Vacuum it at least once a week (more often if you have a lot of foot traffic) to keep dirt from being ground in and trapped in the fibers. Regular vacuuming also helps to extend the life of your carpet by preventing it from becoming worn and soiled.
When vacuuming, be sure to use a rotating brush attachment. These are more effective than suction only attachments. After you vacuum, turn up the heat to 75 degrees if possible. Warm air evaporates moisture more effectively and helps the carpet dry faster. You should also crack open your windows to allow the humidity in your home to escape.
Carpets are typically held down during installation with tack strips that have small nails sticking out of them to hold the carpet in place. These need to be removed before removing the old carpet. A crowbar and a hammer are required for removal (a flat head screwdriver works as well if a crowbar is unavailable). Wearing gloves is strongly recommended to avoid scratching or damaging the floor underneath.
After you remove the old carpet, you’ll need to inspect the space for signs of mold or mildew growth. Dark spots or musty odors are indicative of these problems and should be treated immediately.
Once you’ve cleaned the space, it’s time to install your new carpet. You’ll need to move your furniture back into place after the carpet is completely dry. Moving heavy furniture back on wet carpet can dent and discolor the fibers. It’s recommended that you wait 24 hours for this step, but your technician can give you a better idea of when it will be safe to replace the furniture. You should also vacuum the area again once your carpet is back in place to help prevent dirt from being pushed deep into the fibers. This will keep the color and style of your carpet looking vibrant. You should also rotate your furniture every few months to ensure even wear and reduce the chance of permanent stains or rust marks from metal legs.
Drying
After carpets are cleaned it’s important to let them dry as much as possible. This will prevent the formation of mildew, mold and other microorganisms that can have serious health consequences for occupants of a building. It will also help to reduce odors and give the carpet a clean, fresh appearance.
There are a few different methods for drying carpets, the most common of which is vacuuming. This helps to remove as much water as possible and is usually sufficient for most homes. In more severe cases, you may need to use a dehumidifier and/or a fan to help the process along.
Another way to dry a carpet is by using towels. This method involves spreading a large towel over the wet carpet and walking over it to help with absorption. You can then repeat this as necessary until the carpet is completely dry. This is especially effective in the case of small areas where a spill or other accident occurred.
You can also use fans to promote airflow in the room and help the carpet dry faster. This is particularly helpful when it’s humid outside or in the case of a rainy day that makes it difficult to open windows.
If you have a dryer that can be used on carpet, this is a great option for reducing drying times. However, it is important to remember that some cleaning solutions can leave behind soapy residue on the carpet that attracts dirt and dust particles while it’s damp, causing them to become permanently affixed when the carpet dries.
Another method for reducing drying time is to use a carpet grooming brush and absorbent compound after the traditional cleaning. This will help to suck up any remaining moisture, as well as reducing odors and minimizing the chance of mold or mildew.
Another popular method for shortening the drying time of a carpet is encapsulation. In this process, a machine applies a liquid or foam cleaning agent to the carpet that is then brushed over the carpet. The agent clings to the dirt and debris, creating a powder that can then be vacuumed up. This can cut drying times by as much as 50%, although it is not recommended for heavily stained or heavily soiled carpets.